Table of contents
Google Tag Manager
Install Instructions
Built in Variables
Preview mode and Tag Assistant
Datalayer
Tags
Built in Variables
Preview mode and Tag Assistant
Datalayer
Tags
Analytics essential tags
Enhanced ecommerce tags
Triggers
Page view triggers
Event triggers
Page view triggers
Event triggers
Google Tag Manager
Install Instructions
Add the GTM Container script to every page on the site
A detailed walk through is documented here
If your site contains an iframe that will require tracking then additional steps will be needed to track both the iframe and the main site, a detailed walk through of the set up is documented here
Built in Variable
The use and value of custom variables will be discussed later in this piece, but as part of the initial install enabling some of the key built in variables will improve the initial usability of Google Tag Manager.
To enable the built in GTM variables:
Click on the “variables” tab on the left had side
In the variables window click configure and enable the following variables:
Once these variables have been enabled they will be visible in the variables tab of the GTM preview container.
Enabling them will give you the most visibility over what is happening on your site when a user interacts.
Enabling them will give you the most visibility over what is happening on your site when a user interacts.
If after enabling these events you are still not able to successfully track the interactions that you need then speak to a developer and ask them to include a dataLayer.push event which you can then pick up through the datalayer.
If your site utilises some non standard web features like iframes and single page web apps, then having more hands on involvement from a developer will be required.
Once the tag manager scripts have been added and your built in variables have been enabled it is now time to preview the container to see how well it integrates with the site and you’ll also see how easily data can be passed from your site to GTM


Preview mode and Tag Assistant
The preview mode of Google Tag Manager allows you to test tag and trigger configuration without affecting the “live” site.
Firstly it is advised to download the tag assistant chrome extension. This extension can be downloaded from the chrome extension store
This extension enhances the default preview mode of Google Tag Manager.
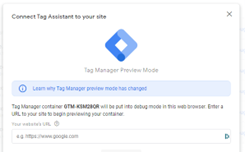
To enable the preview mode click the button on the top right hand corner of the screen.
*NB if these 2 buttons are not visible it is likely that you have not been granted the right access levels. To check this click on the admin panel and then click on ‘user management’
Next you will be asked to add the domain you wish to preview
Once the preview screen loads all the variables that you have enabled will be present in the ‘variable tab’.
If after viewing the site using the GTM preview mode you find that the data you wish to track is not available in GTM but is available on the site then it is time to speak to the developer and ask them to make the required data available in the datalayer. Once this has been done you can collect this data from the datalayer and send it to where ever you need, Google analytics and the Facebook events manager are often the most likely destinations.


The Datalayer
The datalayer is a connection between the website and Google Tag Manager. Any data that can be sent to the datalayer will be visible to Google Tag Manager and can then be used in tags, triggers and variables.
A detailed explanation of the data layer can be found here
Tags
Analytics essential tags
Analytics essential tags
Google Analytics page view tag.
This is the standard page view tag for Google Analytics.
This tag should be set to fire on all pages and is used to send all page view data to Google Analytics.
Google Analytics event tags
Event tags are predominantly used to send interaction and engagement data to Google Analytics. If the required data cannot be tracked in GA with the page view tag then the event tag should be used to track the required interaction data.
Some of the most common event that are tracked through this method include:
- Button clicks
- Clicks on outbound links
- Form submissions
- Video plays and watch time
- File downloads
When setting up an event you must include the following with the event
Event category: this is the name given to a group of events,
Event action: this is the interaction part of the event and tracks the action the user took like, ‘button click’ or ‘video play’
Event label: this is an optional metrics that allows you to send additional data in with the event, if you are tracking video views, you could use this option to send the video name or url of the video.
Event value: this option can be chosen if you wish to assign a numerical value of your event.
Enhanced ecommerce tags
Ecommerce data – enhanced ecommerce
If the site is transactional then tracking ecommerce data is extrememly important and relies heavily on both GTM and the Data layer.
the following variables are essential when tracking ecommerce data.
Product Impressions: the user views the product in some form on the site, this can be on a category page, serch results or simialr product suggestions
'ecommerce': {
'impressions': [
Product Clicks
The user clicks on the product link after the product impression has been recorded. This is the action that brings the user to the product page
'event': 'productClick',
Product Detail Impressions
This event is sent when the user views the product page
'ecommerce': {
'detail': {
Add to Cart
This event is sent when the user adds the product to their cart
'event': 'addToCart'
Remove from Cart
This event is sent when the user removes a product from their cart
'event': 'removeFromCart',
Promotion Impressions
This event is sent when the user views a promotion, similar to product impression
'ecommerce': {
'promoView': {
'promotions': [
Promotion Clicks
This event is sent when the user clicks on a promotion link
'event': 'promotionClick',
Checkout
This event is sent when the user initiates a checkout. The checkout event should be initiated after the user has added to cart
'event': 'checkout',
Purchases
This event is sent when the user successfully completes a checkout. Along with the purchase event all revenue and transaction variables are also sent to GTM through the datalayer
'ecommerce': {
'purchase': {
Refunds
This event is sent when the user successfully completes a refund through the site
'ecommerce': {
'refund': {

Triggers
For every tag there must be a corresponding trigger to fire the event.
Every trigger has a set of rules that need to met before it will fire the tag.
The easiest trigger to understand is the page view trigger, where its requirement to fire is a successful page load.
Most complex triggers are required for more individual installs. For instance an “add to cart” event should only be triggered when a user successfully ads an item to their cart. The trigger for this event would be when the ‘add to cart’ event is pushed to the data layer.
Page view triggers
In addition to the “all pages” page view trigger another classic example of a page view would be a “/thank-you” page trigger. These types of triggers are often used to fire conversion scripts because the user will have completed a desirable action before they reach the thank you page.
Event triggers
These triggers fire when an event occurs on the site, most often these will be an interaction event, like a click on a CTA, a scroll depth event trigger or a video view trigger.
Concluding Recommendation
Our recommendation is that you install a GA4 container, with Google looking to deprecate last click in favour of a data driven model Google Analytics is also due to be deprecated in July 2023. More instructions can be found here in installing a new property


